This past weekend was Evo weekend, which means that for most waking hours for three days, I’m tuned in to Twitch streams from SRK and watching the best fighting game players in the world do things that I’ve only dreamed of.

It’s a fantastic weekend and overall, the streams are well-produced and it’s easy to follow along with the action, get excited, and have a good time. I can’t recommend it enough if you like anything competitive and strongly suggest you watch next year.

While watching, there’s a great group of friends I hang out with in IRC and we discuss the competition and the games being played. Some of us sit at our desks, and some of us sit in living rooms watching the action on a PC display, a tablet or even a phone, or a TV through a device app, like the options available on Xbox 360, PS4, and Xbox One. (Hey, Twitch – how about an Apple TV app?)

I gave no thought to this, but one of that group mentioned that he couldn’t see the players’ names and what sides they were on during the broadcasts from srkevo1. Taking a look, I thought about this and it’s true. On some TVs and using some options on some TVs, the information that was on the screen would not have been visible.

The reason why is what’s called overscan. Let’s take a look at what that means.

Overscan

Traditionally, televisions have had at least some portion of the image outside the bounds of the actual “frame” that was visible. I won’t bore you with a discussion of the history of television, but originally this was because of manufacturing imperfections in CRT (“tube”) displays.

The solution to the manufacturing problem was to put a certain percentage of the display area of the set outside the physical frame of the TV set. This would mean that some of the image would not normally be visible, and a different “slice” of the image wasn’t available to different people.

Today, HDTVs use technologies that measure panels in pixels, so theoretically there should be no overscan. Sets are capable of 1:1 mapping of the pixels of the transmitted image. In practice, this is not how TVs are configured, especially straight out of the box:

I have a Sharp Aquos, and out of the box, it does not display 1:1 pixels, though you can change that and have the TV show the exact image. The same for the Sony set I had previously (both LCDs). The DLP set I had before that had a non-adjustable overscan and I would lose something like 7% of the image.

No; I don’t have any idea why HDTVs overscan by default. The only thing I can think of is that it might be some kind of self-perpetuating problem; broadcasters continue to plan for overscan, and so TV manufacturers build it in by design to make consumers think they are seeing “more” of the image. (Try looking at the ESPN Bottom Line on a display with no overscan and you’ll see what I mean. It takes up a whole lot of real estate.)

So tl;dr: on a lot of TVs, the people watching can’t see all of a given 720p or 1080p image. It’s stupid, but that’s the TV industry for you.

The solution for this in the days of CRT televisions—and something that lives on to this day—is a set of recommendations called safe areas.

Playing It Safe

To make sure information shown on a TV can be seen by all people, various broadcasters came up with the idea of safe areas. These are guidelines for the image to be broadcast that try to make sure that what you put on screen can be seen by as many people as possible.

For various TV standards and various broadcasters, these suggestions have been different over time. To help with the visualization, I’m using this blog post from developer Allen Pestaluky, which claims that the Xbox certification team had (has?) definite guidelines for safe areas on the Xbox 360. It’s in turn based on these comments by Shawn Hargreaves in the XBLIG forums:

Native Xbox games have two different safe areas. They are strongly recommended to keep everything within 80%, and strictly required to keep everything within 90%. A single UI pixel outside the 90% region is an instant cert fail. UI outside the 80% region is going to get mentioned in the cert report, and they’ll most likely be asked to fix it, but if a big commercial developer pushes back and decides they don’t want to do that, it’s not a totally rigid requirement.

For indie games, there is no official cert and thus no rigid fail threshold. Our recommendation for indie games is exactly the same as for commercial titles: Microsoft thinks all games should keep all UI within the 80% region, and would love it if every developer would do this.

These comments are pretty old now, but I think the 90%/80% rules are pretty good. And as we’ll see later, they have been followed quite well. You can see what that looks like in this HD frame:

safe-area-overlay-background

The guides to follow are the insides of each line. To use the traditional terminology, the 90% is action safe and the 80% line is title safe. That means that:

  • You should assume that anything outside the 90% line can’t be seen by anyone and should not put anything there at all.
  • You should assume that anything outside the 80% line can’t be seen by at least some viewers and you should not put anything you definitely want people to see there.

Now, I’ll assume you are reading this as someone broadcasting to Twitch. This means that you should not put any tickers, donation notifications, counters, or anything you want to make sure people can see outside the 80% guideline.

If you are showing just the game, you do not need to worry about this because the game designers already have. You’ll see what I mean in a bit here as I’m going to show you some examples.

I know this sounds ridiculous. “Why would I need to follow these guides if I am streaming in HD and most people are going to be watching on a computer screen—in a browser?” Look at the proliferation of apps embedded in TVs, installed on our game consoles, or used in set-top-boxes like Apple TVs and Rokus.

And if you are also pushing your broadcasts to YouTube, you need to be thinking about this as well because YouTube already has a much greater foothold at the device level. If you are pushing to YouTube you should be more worried about using safe areas.

If we streamers as an enthusiast community want to see the medium gain more mainstream acceptance, we’ll need to consider a broader set of rules for a broader set of devices.

So let’s see how this works in practice.

SRK versus CapcomFighters: FIGHT

Here’s a capture of the titles being used by SRK in their Twitch broadcasting this weekend, conveniently overlaid with the safe areas mentioned above:
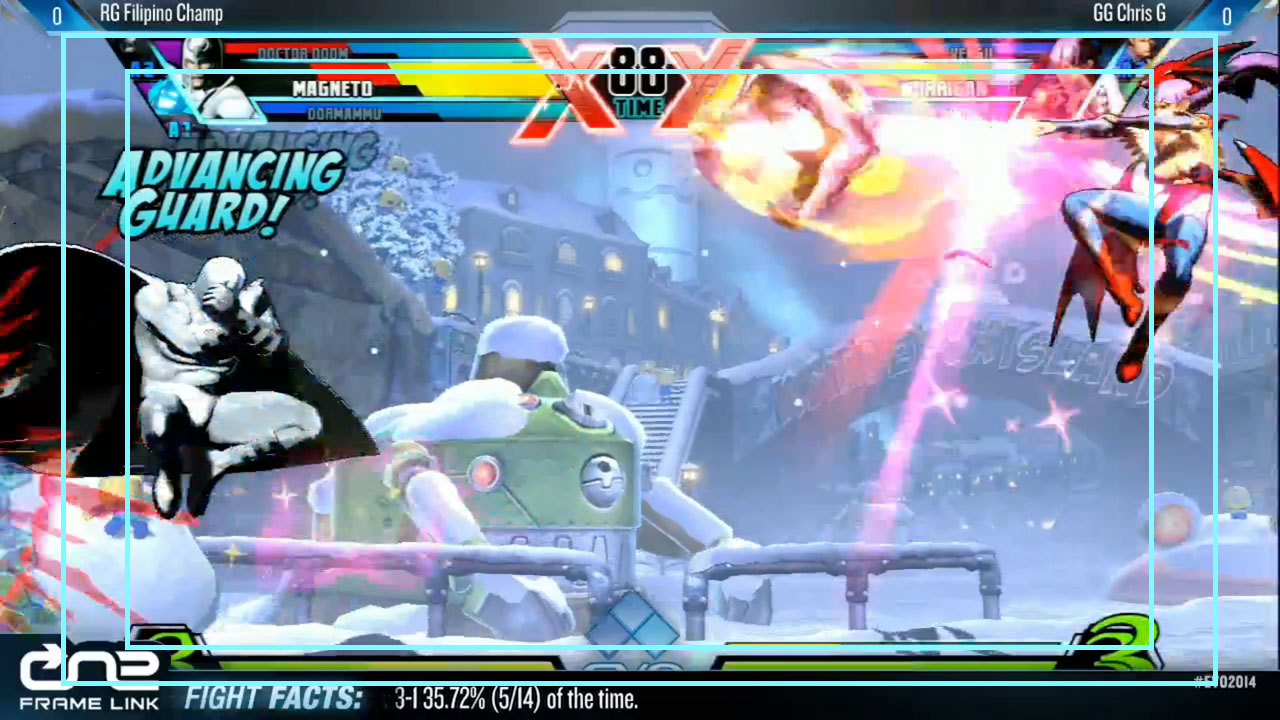
srkevo1-safe

Oof.

You can already see the game UI and how it’s plotted through the Evo titles. UMvC3 pushes display all the way out to the action safe area. (This is probably why the positions of these elements are adjustable in the game’s options.)

But the Evo stream data is way out of bounds. Because they are using the boundaries of the game UI to position their elements, almost everything they are adding to the game image is unsafe. This explains why my friends were unable to see the elements.

Not being able to see who is playing what side sucks and can dramatically change the tone of the experience. Some device viewers might just turn it off because they can’t get the information they want out of the frame.

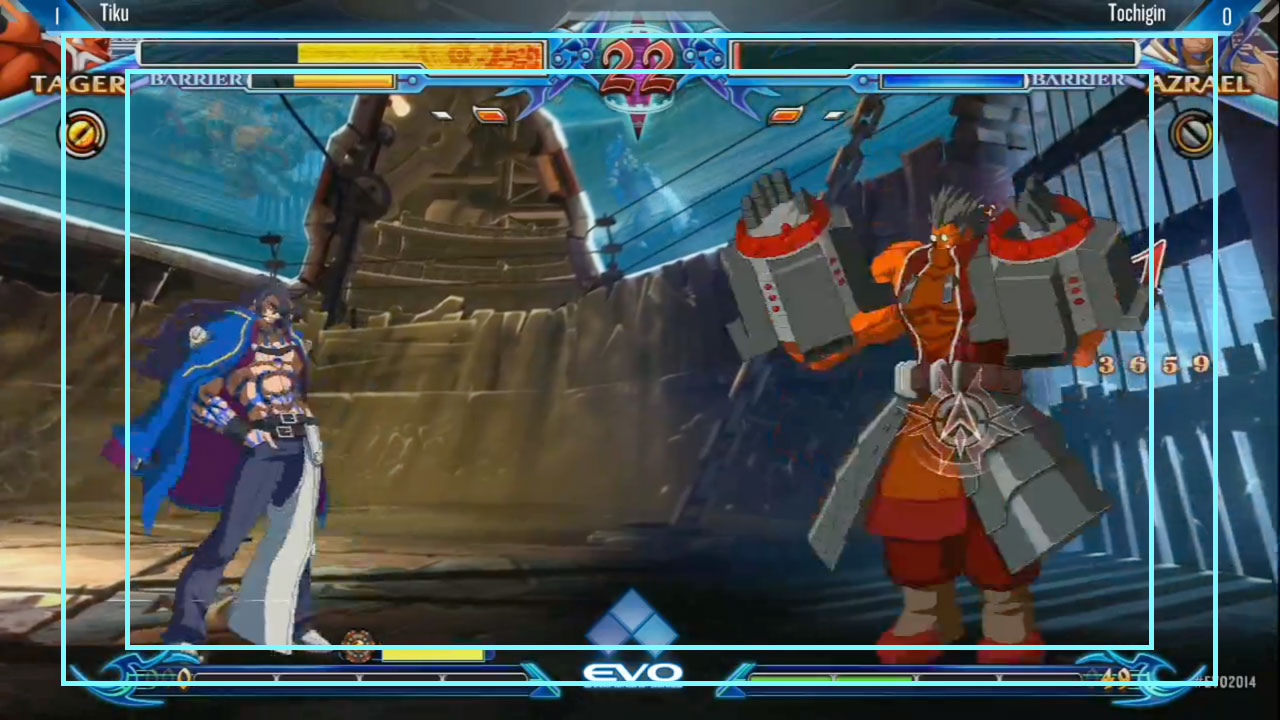
But oh—what’s this? It’s a frame grab from a match (not from Evo) showing the UI frame CapcomFighters uses for its streams:

capcomfighters-safe

You can see the difference immediately. Again, you can see what the game itself does to keep things safe; for SF4, the UI elements that matter are all within title safe! Everything the stream adds that is necessary information is within the 90% boundary. The only elements outside that are the Capcom logo and part of the CPT logo, neither of which are important to someone seeing what’s going on.

Care has been taken here to make sure that everyone will be able to see the status of the match, who is playing, and the score.

CapcomFighters used the same UI bits for their Evo streams. (I like their consistency.) With just a little bit of tweaking, SRK’s streams could do that as well. This isn’t just something that professionals should be paying attention to: if you stream on Twitch or record for YouTube, or do whatever with online video, you should heed these guides and make sure everything you broadcast is at least within the 90% safe guides.

You can download a PNG template for this with transparency here. Add it as an element in your XSplit or OBS scenes as you arrange elements to make sure they fit within the guides. (Just toggle it on and off as you build to make sure.)

You can safely ignore the next section unless you have natural curiosity regarding how games adhere to the guidelines. Go forth and use these guides in your next broadcast!

In-Game Examples

I was curious to see what other fighting games did with this, so here’s a collection of frame grabs I took, with as many direct grabs as possible. You can see how the information is arranged for each game to make sure it doesn’t get crowded out by overscan. UI designers are still dealing with this even in the age of ubiquitous pixel-oriented displays.

BlazBlue

blazblue-safe

This is one of the lesser safe designs I saw. Everything necessary is within action safe, but some elements that should probably have at least some portion within title safe (like the health bars) don’t.

Injustice

injustice-safe

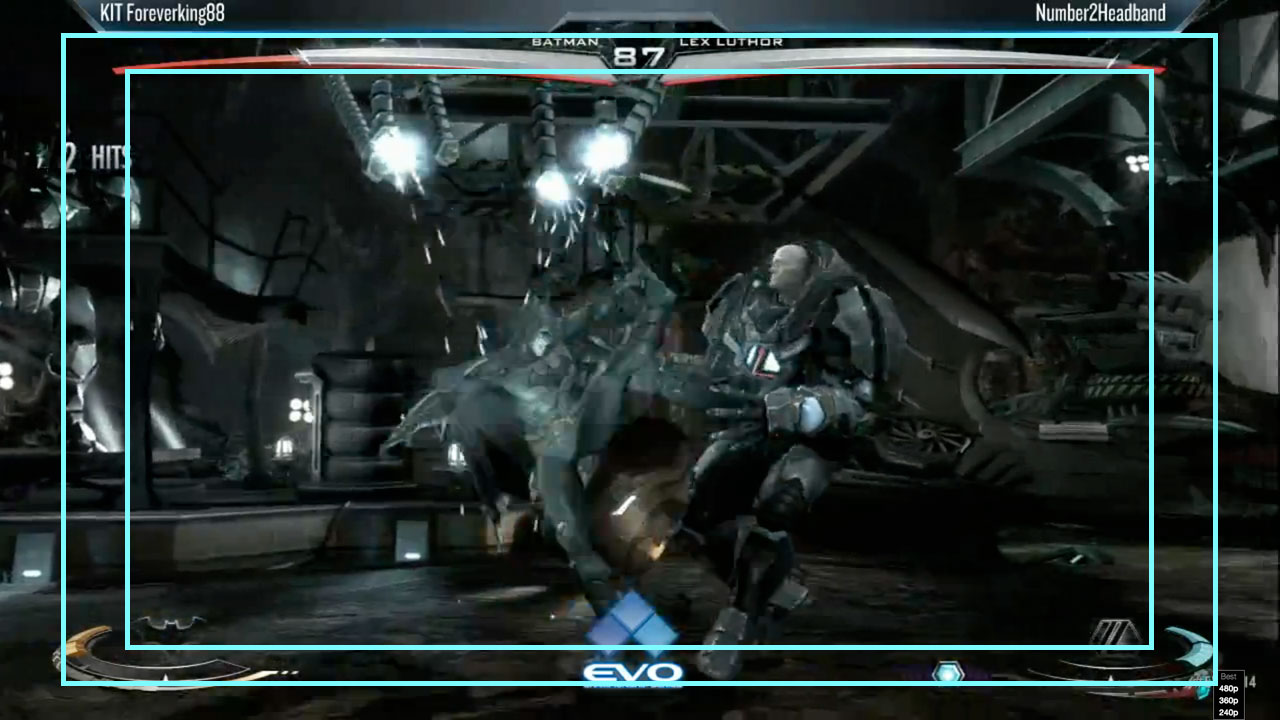
All of the UI is outside of title safe on Injustice, but it’s all action safe. This is the worst one I have found so far.

Killer Instinct

killer-instinct-safe

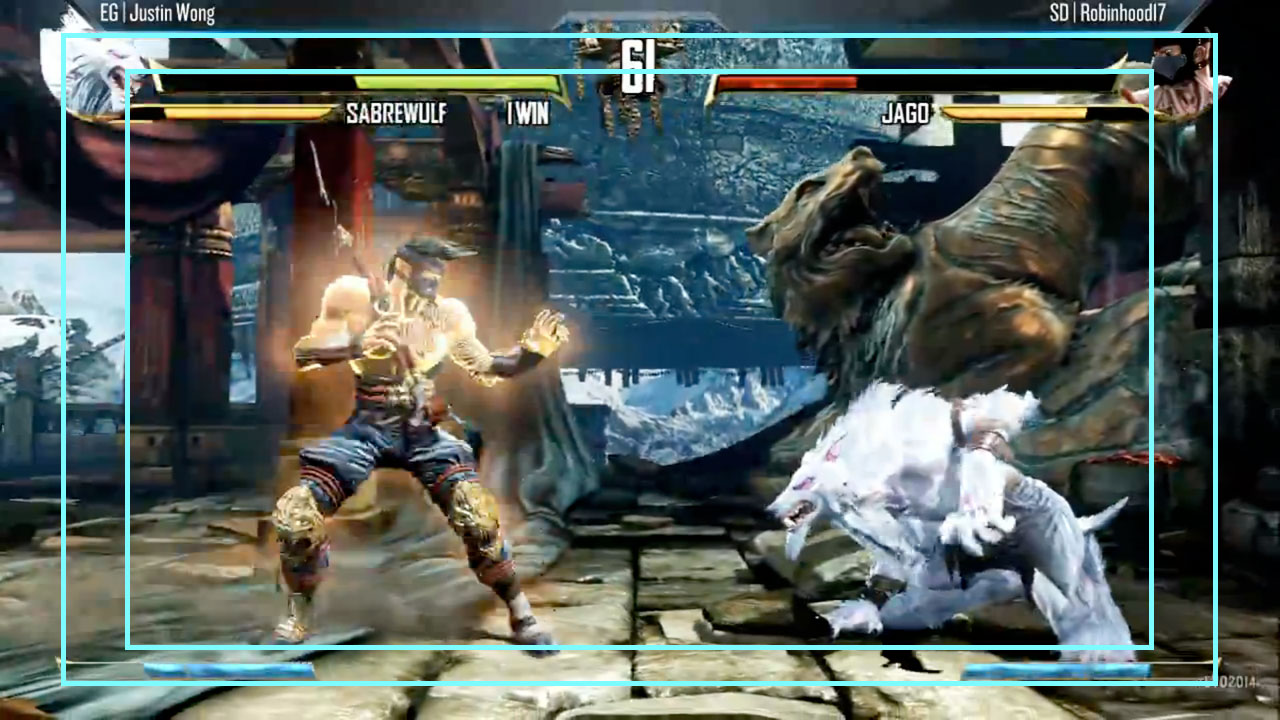
I thought that perhaps being on Xbox One would mean that the UI would be pushed further out, but for KI, all the health information is within title safe. You could theoretically infer the timer information with only the bottom half of the numbers. The meters at the bottom are just on the edge of action safe and it’s possible that some people might not be able to see them by default.

Marvel vs. Capcom 3

mvc3-safe

I posted this above with the Evo chrome but thought I would put a clean one here just for reasons. I think the health display is pretty clever as the active main is always in title safe and in action safe you are missing only one team member’s health. The super meter is a different story.

Super Street Fighter 2 Turbo HD Remix

ssft2hd-safe

I’m including this mostly for fun, but it’s interesting that the health being title safe and the super meters being action safe appears to be somewhat consistent for Capcom. This one’s very conservative.

Virtua Fighter 5

vf5-safe

This is pretty safe. Even if you were way out at 80%, you’d still be able to see the health bars somewhat.

Ultra Street Fighter IV

This one’s interesting because there are two separate defaults in the game options. There is one that is the default default, and a setting for “arcade” default. This is the standard default:

ultra-standard-safe

Super-safe. Everything necessary is within the title safe area. I really appreciate the design thought that went in to this because it’s literally just the basic information. Any UI that could be trimmed at title safe is.

Here’s the arcade default setting:

ultra-arcade-safe

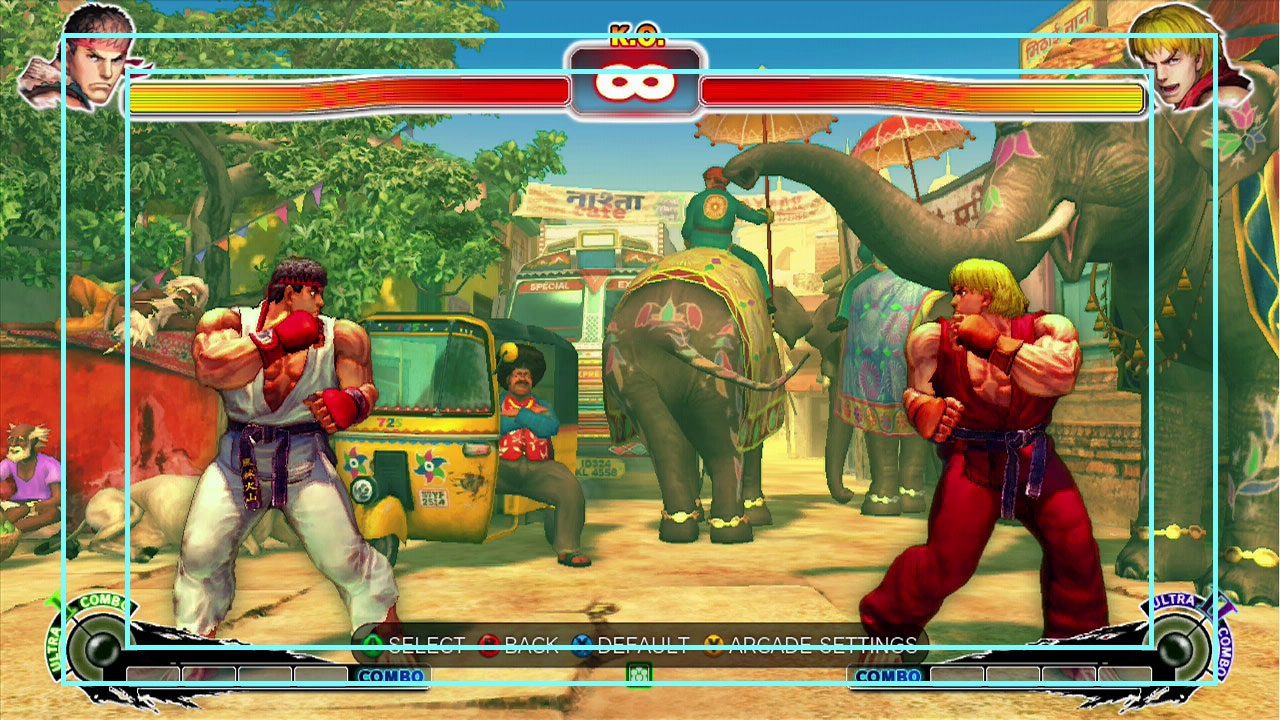
This pushes everything out to action safe. I’m assuming this is because arcade operators would have more control over the display panels that are used in the machines and would have to worry about overscan much less than Capcom apparently needs to worry about to keep the game in cert.


So though I have only posted a small handful of videos on my YouTube account, and those videos do not have monetization enabled, I am seeing claims on them in my account.

I wasn’t notified of these claims by email or any other medium that I can find, and the videos were not taken down, nor is my account in bad standing.

Here’s what it looks like in my Video Manager panel:

Screen Shot 2013-12-12 at 5.45.44 PM

Screen Shot 2013-12-12 at 5.45.28 PMAs you can see, there is an option to dispute the claims, but as YouTube can summarily dismiss your channel if you run afoul of too many copyright notices. I’m not sure if disputing a claim and having that dispute struck down counts as a strike, so I’m hesitant to do it.

This isn’t a big deal for me, but for people who are making a lot of money off a lot of videos on YouTube, it’s probably a bit whack-a-mole-y. IMO it’s just going to push more people towards streaming instead of offering videos on demand. (And, regardless of the fact that YouTube is opening streaming to the masses this month, I’ll bet that Twitch will end up being the beneficiary.)


For some time now I’ve wanted to have a gadget that would allow me to grab footage from games I’m playing and either stream that content to a service like Twitch.tv or post it to YouTube or VideoPress. Over the last two weeks I’ve purchased a couple of solutions to try them out and after some testing I think I’ve found the winner, at least for now.

The one I won’t be returning is the Elgato Game Capture HD, and for most people who would like to capture gameplay, I can recommend it as a starting point for capturing gameplay video. I’ve done some tests with the device and will insert them throughout the review; all YouTube videos in this post were captured in my living room using the Game Capture HD.

What’s in the Box?

The Game Capture HD is a pretty simple package. You get:

  • The Game Capture device
  • A 1-meter HDMI cable
  • A 2-meter mini-USB cable
  • A 1-meter PS2/PS3-to-DIN cable
  • A very short DIN-to component/RCA stereo breakout cable

In short, everything you need to use the device comes with it, which is very handy. As far as the computer hardware you need, it’s best to look this up on Elgato’s site, but it works with USB 2 (something its competitors sometimes don’t), is completely external, and works with both PCs and Macs. (I did my testing on a Mac.)

The device itself is not much larger than a deck of standard playing cards:

DualShock 3 and a 360 controller for comparison.

As you can see, there isn’t much to it. On one end, there is an HDMI out, which is a passthrough to your TV or other monitor, and the mini-USB connector that goes to your computer:

And on the other end, there is the HDMI in and the DIN in, which can accept either the Ps2/Ps3 cable or the component breakout:

That’s the extent of what you get when you buy it. You’re not left without anything, which considering the price of the unit, is quite nice. All the cables you need to hook it up come with it. You will need to download the software from the Game Capture site, which is a small (<100 MB) download and consists of only one application that is installed to your computer. It’s as minimalist as I think a capture box can be.

What About the Software?

The software itself is pretty simple and easy to grasp. When you start it up it will wait for you to connect the device if you are in the Capture screen.

Your input to the capture device is shown on the left. To the right, you can set options for the GCHD, check sound levels if input is running, give title information for the video before you start, and start the recording. The options that are available are pretty easy to figure out as well:

“Input Device” will tell the GCHD what to expect, from a choice of Xbox 360, PS3, and iPad, though as long as you have the input source selected properly, I found that it was pretty good at adjusting to whatever I had hooked up to it. You can adjust the bit rate of the compression used as the device sends the video to your computer for storage, and if you want you can also make some image adjustments – though those adjustments will also be reflected on your display, so I didn’t use them.

On the Capture screen, there is a short timeline in the corner near the big giant record button:

This acts as a buffering interface, much like a DVR. If you are running your game through the GCHD, it will automatically buffer the last hour of gameplay for you. If you want to begin recording, the default option is just to start with the current live point of the video, but if you would rather back that up to catch something awesome you did before starting the record, you can scrub the marker back on the timeline and adjust the starting point.

This is a nice feature and if you are cool with running your game through the GCHD all the time, can save a moment here and there that you might not otherwise have caught.

When you want to work with the video you have already collected, you use the Edit screen.

Your already-recorded videos are arranged based on the game title you entered when recording each video. There is a timeline view that has rudimentary razor and delete tools, and you can review the video as you please. There are also built-in exporting options in the lower-right. You can configure GCHD to use each of those services and it will appropriately compress the video for you and then upload the video as you need. You can see that it will also create local files for you optimized for your devices—or if you would rather move to something like Final Cut you can just dump a ProRes version and carry on.

What Makes the Game Capture HD Awesome?

The one-touch record and export are definitely the best parts of the package. Hooking up the GCHD is dead simple and using the software is even easier. It’s game recording at the push of a button, and you don’t have to know the slightest thing about video codecs, compression, or editing to get your footage shared to a bunch of services. In that way, if you are just looking to show people some games, and you don’t want to drop a serious amount of cash, it’s a great device. I never had a problem with it doing exactly what it advertised, and never had a hardware freeze or a software crash in all the time I tested it.

The video management is pretty good and keeps things organized and easy to find. File sizes and types are manageable, and you don’t need a high-performance computer, hard disk array, or data transport to use it. Having it run on USB 2 must not have been simple, but it works and means that a lot more people will be able to use it.

It will also record video from an iPad 2 or later, or an iPhone 4 or later, as you can see:

This is really neat, because I figured it wouldn’t be this simple. With the GCHD it’s just plug-and-go. If you are a software developer and you would like to give demos of iOS applications using video, this would be a great tool to have.

That said, there are a few hangups, depending on what you really want to do.

Where Does It Fall Short?

You shouldn’t buy the GCHD if any of the following are really important to you out of the box:

  • You want to stream your gameplay to Twitch.tv instead of record it.
  • You want to record your voice while you play the game and have that be part of the video.
  • You want to play the game on your computer monitor or don’t have a TV handy.

Let’s talk a bit more about those.

The main problem that gets in the way of those is that the device itself is doing a lot of the encoding before the video even makes it to your computer. Because of this, there is a delay (depending on the bit rate you are using) that is a few seconds between what you are doing and what appears in the GCHD software. (This delay doesn’t affect the passthrough, which works flawlessly.)

The GCHD software doesn’t have any method available to mix in additional sound sources such as a microphone to your video. I hope this is something they are looking into adding in a future update because I know the lack of commentary ability will turn off a lot of people, like Minecraft players for example. If you wanted to you could record audio at the same time and then mix it in using an app like Premiere after the fact; you would just need to deal with the timecode difference—but it’s a lot of work to do all that.

Similarly, you can’t stream the video directly from the device. It doesn’t function unless the matching software is running on your computer, and it doesn’t appear as a capture device in any other applications. I did some gymnastics with my computer using CamTwist and recording the GCHD software window to pipe that into Flash Media Encoder, but that just made my MacBook sound like it was going to take off and the footage didn’t look all that awesome. I think it’s too much work for most mortals. As with the commentary thing above, I hope this is in mind at Elgato for a future update. It’s definitely on my wish list.

Other limitations that might give you pause but are far from stowstoppers:

  • You can’t record or passthrough at 1080p, but not much other than super-pro gear can. You’re limited to 720p or 1080i. And the GCHD can’t capture older SD sources.
  • The GCHD won’t passthrough Dolby Digital audio, or at least it didn’t in my testing. You’ll need to run an optical from a 360 direct to the receiver, and if you are trying with the PS3 you are pretty much out of luck. You’ll get Pro Logic II (matrixed surround) and that’s it.
  • If you leave it hooked up all the time, the passthrough won’t work unless you have the GCHD hooked up to your computer and the software running. It’s both or nothing.
  • You can’t record any HDCP-protected content via the HDMI connection. This includes PS3 games, which for some inexplicable reason, have their video output copy protected.

Some of the stuff that’s listed above can be alleviated with a software update or two (or so I would guess), but there are some things that are just limitations of how the device is made and intended to be used.

What Else Did I Test?

For purposes of making a wise decision, I also tested a Blackmagic Intensity Shuttle Pro. I was originally going to keep it, but after some additional testing I decided against it. Without getting into that device too much, my comparisons:

What it does better: is a capture device and so can stream directly: theoretically no audio lag: can be mixed with other audio sources; can capture from SD sources; more powerful overall.

What it does worse: definitely not plug-and-play; requires USB 3 or Thunderbolt (depending on model); much more CPU-intensive to use; doesn’t compress on the fly; had an audio lag I couldn’t resolve in practice; brought my computer to its knees; streaming was promising but ended up muddy and choppy in the end.

In the end, I kept the option that was simpler mostly because I can’t afford a new computer right now. I really want to stream gameplay, but I think I am going to have to look into building a PC specifically to do that at some point and use an internal card solution from AVerMedia.

Conclusions: Should You Buy One?

If you are looking for a low-cost ($180 on Amazon) and easy-to-configure way to capture your gameplay footage and post it to YouTube or share it on your blog, it’s a winner. It’s quick to set up, portable, simple to use and figure out, and gets the basics right. With some additions to the software in the future, it could be the only piece of hardware you would ever need for capturing footage from the current crop of consoles.

It works with lower-spec computers than many of the other options out there, is pretty much the best solution I have seen for the Mac, and can ever grab stuff like iOS footage without needing to goof around with settings and video formats.

It’s a winner.

If you have questions about my review or the GCHD, drop a comment below. Otherwise, watch 10 minutes of Pai and don’t forget to tip on your way out:

A team of creatives, tech geeks, marketers and writers gathered in an undisclosed location in Portland, Oregon yesterday and produced 87 short comedic YouTube videos about Old Spice. In real time. They leveraged Twitter, Facebook, Reddit and blogs. They dared to touch the wild beasts of 4chan and they lived to tell the tale. Even 4chan loved it. Everybody loved it; those videos and 74 more made so far today have now been viewed more than 4 million times and counting. The team worked for 11 hours yesterday to make 87 short videos, that’s just over 7 minutes per video, not accounting for any breaks taken. Then they woke up this morning and they are still making more videos right now. Here’s how it’s going down.

So far, this is one of the best advertising pushes I’ve seen on the Internet. It’s truly inspired.

(via How the Old Spice Videos Are Being Made – Read Write Web.)

William L. McKnight, chairman of 3M, in 1948(!):

As our business grows, it becomes increasingly necessary to delegate responsibility and to encourage men and women to exercise their initiative. This requires considerable tolerance. Those men and women, to whom we delegate authority and responsibility, if they are good people, are going to want to do their jobs in their own way.

Mistakes will be made. But if a person is essentially right, the mistakes he or she makes are not as serious in the long run as the mistakes management will make if it undertakes to tell those in authority exactly how they must do their jobs.

Management that is destructively critical when mistakes are made kills initiative. And it’s essential that we have many people with initiative if we are to continue to grow.

Last week’s read was William Zinsser’s On Writing Well, which I heartily recommend as it exposed to me several shortcomings in my own writing processes. This week, I’m reading through Scott Berkun’s The Myths of Innovation, which is a work full of truths that, deep down, everyone knows but finds hard to accept.

The Myths of Innovation led me to track down and watch this YouTube video of a Google Tech Talk from Berkun, which in turn led to my discovery of the above quote.

According to TechCrunch, YouTube uploads from mobile devices are up 400% since the launch of the iPhone 3GS:

Even without the iPhone, YouTube is seeing major growth across the entire mobile space — the site has seen uploads go up 1700% over the last six months. It’s not hard to guess why. Video-enabled smartphones are becoming increasingly popular, as are high speed data connections. YouTube also attributes part of the growth to a streamlined upload flow (note how easy it is to upload a video from your iPhone to the site), as well as its improved sharing capabilities (you can now syndicate your videos to services like Facebook and Twitter).

I wonder how AT&T’s network engineers are handling this kind of influx of data transport.

In my ongoing effort to create some kind of focus here on this blog, I’ve decided to create a “sub” blog (if you will) to hold things like my links posts and other little things that don’t really belong in this format. It’s going to be updated far more often than this blog is, so I hope you’ll also add it to your RSS feedreaders if you’re listening in on this one.

As I type this entry, it contains a single YouTube embed, but I plan to expand on it to include small anecdotes, quotes, pictures (maybe some moblogging eventually), and whatever other odds and ends I don’t think belong on this blog with this format. What will stay here are the longer-form posts that take more time and editing, as well as picture galleries and the like. Bonus Round is for trivial things.

It’s also using a WordPress theme called P2, which I’ve recently been experimenting with and I think fits this kind of an idea quite nicely.

If you like what you see, leave a comment. Since comments appear on the main page on the Bonus Round, I have moderation turned on. See you there.

(Photo credit: Galaga Game Over by flickr user Liquid Lucidity.)